
Neck pain can be very frustrating and sometimes exercises can make it worse. Today we are covering exercises that will help alleviate some of that pain. Read more below about the exercises and the proper techniques to help alleviate your pain.
CAUSES OF NECK TENSION
-
- Poor posture: constant strain on your head and neck due to incorrect positions, movements and permanent stress at work, in your daily life or when exercising
- Mental stress: psychological strain
- Weak immune system: for example, due to a cold
- Accidents and injuries: for example, whiplash or a pulled muscle
In my opinion, and that of many experts, the main reason for neck tension and pain is often a lack of mobility of the thoracic spine. The thoracic spine is designed to move in the form of rotations (turning), flexions (bending) and extensions (straightening). However, the opposite is often the case in daily life. We have turned into marathon sitters and couch potatoes whose poor posture is increasingly limiting the functional mobility of the spine.
In the case of acute neck tension, there are a number of methods you can use to relieve the pain. The following five exercises improve the mobility and the flexibility of your thoracic spine. Giving yourself a myofascial massage with the help of tennis balls or fascia (foam) rollers is another good way to release muscle tension.
5 BEST EXERCISES TO EFFECTIVELY ELIMINATE NECK PAIN:
1. FASCIA ROLL/TENNIS BALL: UPPER AND MIDDLE BACK
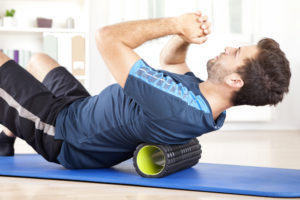 Starting position:
Lie on your back. Place the foam roller under your back at the height of your shoulder blades. Raise your hips off the floor and engage your abs and glutes. Make sure that your hips, back and neck form a straight line. Put your hands behind your head to support your neck.
How to do the exercise:
Slowly roll back and forth to massage your back muscles and mobilize your spine.
Variation:
You can use a tennis or a golf ball to target specific painful spots. Maintain pressure on particularly painful spots for 20 to 40 seconds until the pain subsides.
2. STANDING AWTUVI EXERCISE
Starting position:
Stand with your back to a wall. Your arms and your entire spine should be touching the wall. Pull your shoulder blades back and down. Press against the wall with your shoulders, elbows and wrists.
How to do the exercise:
Move your arms through the various positions to form the different letters.
Start by bending your elbows and moving them up to chest level to form a W.
Stretch your arms out to the side at the level of your chest/shoulders to form a T
Bend your elbows 90 degrees and raise them to shoulder level to form a U
Straighten your elbows and raise your arms diagonally above your head to form a V
Stand with your arms raised directly above your head to form an I
Repeat the exercise several times.
3. PRONE AWTUVI EXERCISE
Starting position:
Lie on your stomach. Place your arms at your side with your elbows slightly bent.
How to do the exercise:
Perform the exercise in the same way as the standing position, but this time in the prone position. Repeat the exercise several times.
4. SITTING T-SPINE ROTATION WITH FOAM ROLLER
Starting position:
Sit on a chair. Keep your upper body straight and lace your hands behind your head with your elbows pointing out. Put the foam roller between your thighs. Press your thighs together to stabilize your hips.
How to do the exercise:
Turn your head, elbow, shoulder girdle and thoracic spine to the side. While still in this position, tilt your upper body to the side. Repeat the exercise several times.
Click here to continue reading.
Original article posted by Runtastic.com.


